@EnableScheduling - Awesome annotations in Spring Boot
The Spring Framework is one of the most widely used backend frameworks in companies of all sizes, from startups to enterprises. At first glance it seems that the framework revolves around simple controller - service - repository model. But it has a lot to offer.
Spring Boot is an opinionated framework, meaning it autoconfigures a lot of things out of the box. Which means the framework enables and disables certain aspects of the way your application behaves. We will look into enabling some of those features in this blog post.
The abilities of this framework are uncovered as one discovers the @Enable series of annotations. In this series of blog posts, we will take a brief look of those annotations: @EnableCaching, @EnableScheduling, @EnableAsync, etc. This post focuses on the second one.
You can read the previous post in this series here: @EnableCaching - Awesome annotations in Spring Boot
Context
While developing software, there is often an requirement, where certain things should occur at a specified interval, for as long as the application is running. For example, if you happen to work on any application that has human users, they ought to have a birthday.
It would be a nice touch of personalisation if they get a “Happy Birthday” email, sometimes it may also happen that it is the only wish that they receive. This is being said assuming that you have the required data, their date of birth.
Consider another example, slightly technical than the previous one. Let us say your application has implemented caching as discussed in previous blog post. In some use cases, it is possible that the cache becomes stale, because it has been aged enough. In this use case, you would like a cache being cleared after it has aged enough, say 1 day. Now we need a mechanism to clear this cache every 24 hours.
The Annotation
In order to be able to use Scheduling features, we need to add the @EnableScheduling annotation on one of our configuration classes to tell Spring that we want to enable scheduling in the application, and spring will do the homework of auto configuring various components like the TaskExecutor, Trigger, etc.
Once that is set up, we can then proceed with adding the @Scheduled annotation to our methods. One of the required details that we need to configure with the annotation is when we want our method to be invoked, at what interval. To begin with, there are two ways to configure that: fixedRate and fixedDelay.
@Scheduled(fixedDelay = 60_000)
public void fixedDelayTask() {
    log.info("doing the task after delay of 60_000 ms");
}

@Scheduled(fixedRate = 60_000)
public void fixedRateTask() {
    log.info("doing the task every 60_000 ms");
}
fixedDelay will wait for completion of task previously triggered. This way, the duration between completion of last task and beginning of current task is fixed.
fixedRate will start the task at given interval regardless of completion of last task.
Simple Example to understand the difference:
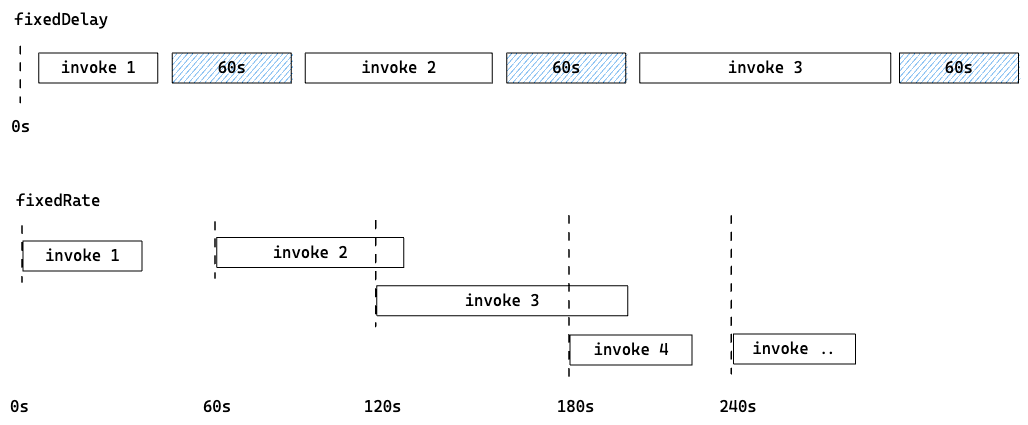
Looking closely, we can see that in case of fixedRate, when the method is invoked for the third time, the previous execution is not complete. In this scenario, next task won’t be invoked until the previous task has finished execution. To enable parallel execution of two or more tasks, we’ll need to configure the Spring application to use @Async and make use of multithreading under the hood.
Additional Configuration Options
If your use case demands, you can also delay the first invokation of the scheduled method by using the initialDelay attribute.
@Scheduled(fixedDelay = 60_000, initialDelay = 60_000)
public void fixedDelayWithInitialDelayTask() {
    log.info("doing the task after delay of 60_000 ms and an initial delay of 60_000 ms");
}
You can also use cron expressions to configure the interval of your scheduled method, like shown in the example:
@Scheduled(cron = "*/60 * * * * *")
public void cronExpressionTask() {
    log.info("doing the task after every 60_000 ms");
}
While configuring scheduled tasks is easy, it can sometimes be tricky to debug. Make sure you set up proper logging before the actual processing to be done in the scheduled method, i.e. before there is any potential error or exception is thrown. While investigating, you don’t have to spend time thinking if something went wrong with scheduling and the method was not invoked altogether or something went wrong after the scheduled method was invoked.
References:
- The @Scheduled Annotation in Spring - Baeldung Blog
- Task Execution and Scheduling - Spring Documentation
- CronTab - Test your cron expressions (supports 6 fields)
- CronTab Guru - Test your cron expressions